Make Lenovo Tab3 8 plus WiFi Hotspot Setup and use personal wifi hotspot continue. Sometimes, it’s may not be worked for the general android smartphone user. For such cause, there was a problem at the time of setup wifi hotspot. So it does not matter for you. You should setup the process successfully. Also, I will provide the whole information for everyone and you can follow such effective information. Nowadays, without a wifi connection, we are unable to go ahead so that we need proper setup wifi hotspot of our Lenovo android smartphone.
Lenovo Tab3 8 Plus WiFi Hotspot Setup
If your smartphone will be locked via Google account and you have not any document for unlocking the smartphone, you can bypass the smartphone easily. On the bypass option, you have to use the wifi hotspot connection. So if your wifi hotspot configuration will not be success clearly, you will face various unexpected problems. So don’t worry and go ahead to make Lenovo Tab3 8 Plus WiFi Hotspot Setup.
Setup WiFi Hotspot on Lenovo Tab3 8 Plus
- Tap on Apps and to the Setting option
- Now tap on the More option
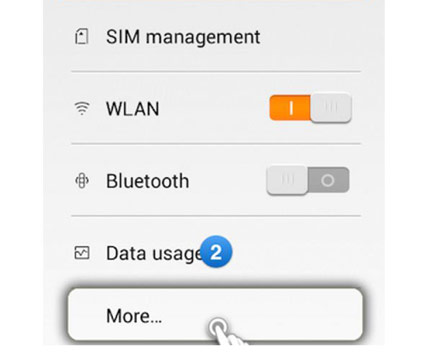
- View Wireless & Network option from more option
- Now view the Mobile network sharing option
- Now, press Setup WiFi hotspot of Lenovo Tab3 8 Plus
- Put the Router name or Network name on the SSID field
- Select Security WPA2 (AES)(Required for password)
- If select None security (Required for none password)
- Save the wifi hotspot setting
Turn On your WiFi hotspot program and establish the Connection
- Take another device that you want to connect with Lenovo Tab3 8 Plus
- From this device, turn on WiFi systems
- Now, Find the available network from the wifi fields
- This is available wifi network that you had been put on SSID field
- After finding, select and connect the wifi
- If WPA2 PSK creation, then type password otherwise, none
- After created the connection successfully, you would be able to use wireless internet or wireless Wi-Fi easily.